DTF transfers workflow is the backbone of modern garment decoration, guiding a digital design from concept to a durable, color-rich print that adheres reliably to a wide range of fabrics, while offering scalable options for small batches or mass production. A well-planned flow reduces waste, minimizes reprints, and supports consistent color fidelity by aligning with established benchmarks such as DTF transfers process and the specific curing and drying requirements that prevent subtle shifts in tone across runs. In this descriptive guide, we explore the direct-to-film printing steps in detail, from preparing artwork with proper white underbase layers to selecting compatible ink sets, and we explain how these decisions impact adhesion, opacity, and the final hand feel of the transfer. The DTF printing workflow hinges on precise color management, reliable film handling, and careful coordination with the heat pressing phase, including practical DTF heat pressing tips that help achieve even texture, smooth edges, and durable results on cottons, poly blends, and performance fabrics. By following these integrated steps, operators can reproduce artwork with repeatable accuracy, reduce downtime between jobs, and build a scalable production system that keeps pace with evolving design demands and customer expectations.
An alternative framing of this process is the film-to-fabric decoration pipeline, where a digital design is captured on a transfer sheet and then applied to garments using heat and even pressure. From an SEO-friendly, Latent Semantic Indexing perspective, this may be described as a color-accurate transfer workflow, substrate preparation for heat-transfer products, and a finishing-adhesion routine that emphasizes curing, powder adhesion, and post-press care. Understanding these related terms helps designers, print shops, and operators optimize the same sequence under different terminology while maintaining the core practices of setup, execution, and quality control.
DTF transfers workflow: From Design to Dry
Understanding the DTF transfers workflow means mapping every stage from artwork to the final dried film, ensuring color fidelity and durability across fabrics. This end-to-end process covers design preparation, film creation, printing, curing and drying, powder application, heat pressing, and finishing. By framing the project as a complete DTF transfers workflow, you can anticipate bottlenecks and align resources to deliver consistent results from small runs to large batches.
A well-planned workflow minimizes reprints, reduces ink and powder waste, and ensures that each step—from design to dry—optimizes efficiency and color accuracy. Prioritizing color management, correct white layer handling, and reliable curing and drying helps you reproduce artwork with predictable results across cotton, blends, and synthetics.
DTF printing workflow: Color management, film, and ink choices
DTF printing workflow demands robust color management, reliable white underbase handling, and ink choices compatible with the transfer film and substrate. This stage relies on layered artwork with CMYK channels plus a dedicated white layer to create opacity and brightness on dark fabrics.
Select printers and inks designed for DTF and ensure RIP settings control ink density and dot gain. Printing tests, swatches on film, and color proofs are essential to verify alignment with the substrate and prevent misregistration before production.
Direct-to-film printing steps: A practical sequence
Direct-to-film printing steps begin with artwork preparation and separation, then film preparation and layout using templates for repeats. The actual printing onto the DTF film follows, with attention to alignment and white layer crispness.
Keep the film clean and verify the printed white base is opaque enough to support the subsequent color layers. After printing, plan for curing and drying and move to powder application with consistent coverage.
DTF curing and drying: Stabilizing prints before powder application
DTF curing and drying stabilizes the printed image, preventing color migration and smudging during powder application and transfer. The cure step ensures the film is dry to the touch and ready for the next stage.
Environmental controls matter: monitor temperature and humidity, allow adequate drying time, and verify that the printed image remains intact under light pressure. Proper curing and drying improves adhesion and reduces rework.
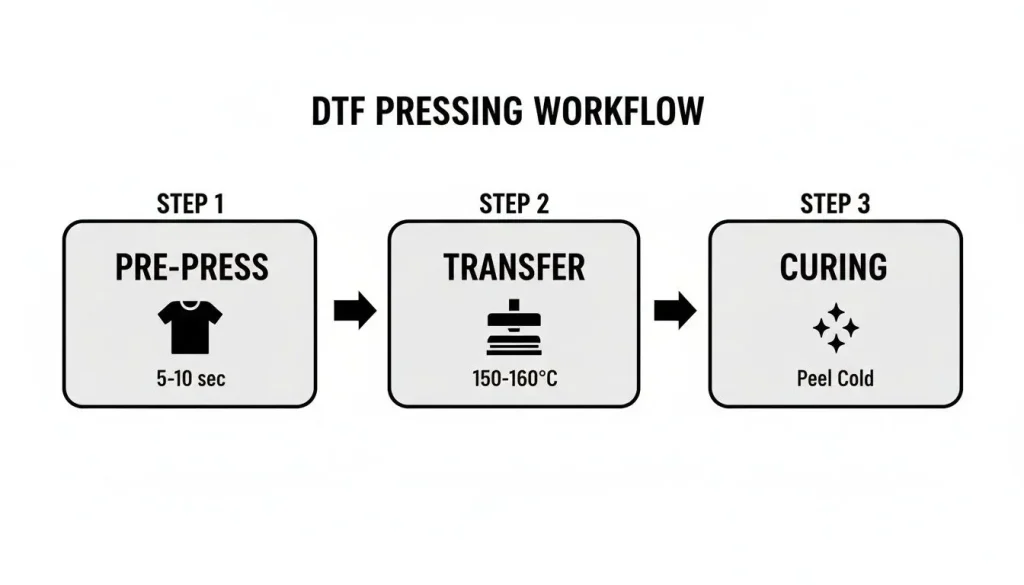
DTF heat pressing tips: Achieving durable, vibrant transfers
DTF heat pressing tips help you achieve durable, vibrant transfers across fabrics. Focus on achieving consistent heat, pressure, and time, with a smooth platen, and use a cover sheet to promote even heat distribution.
Test on representative fabrics, decide whether a hot peel or cold peel delivers the best color transfer, and finalize with post-press handling and care instructions to extend life.
Frequently Asked Questions
What is the DTF transfers workflow and how does it impact color fidelity and durability?
The DTF transfers workflow is the end-to-end process from design to finished garment, covering design preparation, film preparation and layout, printing, curing and drying, powder application, heat pressing, and final finishing. This workflow directly affects color fidelity, adhesion, and durability. Key practices include calibrated color management, reliable white-layer handling, thorough test prints, and consistent process documentation to minimize reprints, waste, and time-to-market.
What are the key stages in the DTF transfers workflow and how does each stage influence final results?
Core stages are design and file preparation, film preparation and layout, printing, curing and drying, powder application, heat pressing, and finishing. Each stage shapes results: design with proper color separation and CMYK plus white layer; precise film layout and alignment; printing settings that preserve color and edge detail; complete curing to prevent smudges; even powder coverage for strong adhesion; careful heat pressing for durability; and final quality checks for consistency.
In the DTF transfers process, what are best practices for the direct-to-film printing steps to ensure crisp images?
Best practices for the direct-to-film printing steps include using clean, dust-free film; applying alignment templates to ensure correct placement; keeping the white layer crisp and opaque; and using RIP/color-management settings to balance saturation and ink density. Always print test swatches on film to verify color accuracy, registration, and white coverage before running larger batches.
What are effective DTF heat pressing tips to maximize adhesion and durability across fabrics?
DTF heat pressing tips include selecting a consistent temperature (commonly around 160–170°C/320–338°F), a controlled dwell time (about 15–20 seconds), and firm, even pressure. Use a protective sheet (Teflon or parchment), choose hot or cold peeling based on material, and ensure the garment is flat and fully cooled before handling to improve adhesion and durability.
Why is curing and drying critical in the DTF transfers workflow, and how can you optimize this stage?
DTF curing and drying is critical because it stabilizes the printed ink and white layer before powder application and heat pressing, preventing smudging and color migration. Optimize this stage by drying in a dust-free environment with controlled temperature and humidity, allowing the film to dry completely, and validating stability (no tackiness) before moving to the next step. Proper curing reduces rework and improves transfer reliability.
| Stage | Key Points |
|---|---|
| 1. Design and file preparation (DTF printing workflow) |
|
| 2. Film preparation and layout (DTF transfers process) |
|
| 3. Printing (DTF printing workflow) |
|
| 4. Curing and drying (DTF curing and drying) |
|
| 5. Powder application and curing (DTF heat pressing tips) |
|
| 6. Transfer via heat pressing (DTF heating and pressing) |
|
| 7. Finishing and quality checks (From design to dry) |
|
| Quality considerations across the DTF transfers workflow |
|
| Practical tips for a smoother DTF transfers workflow |
|
| Common pitfalls and how to avoid them |
|
Summary
Conclusion will follow.