DTF transfers workflow is redefining how small businesses and hobbyists bring designs to life on fabrics. From artwork prep to the final heat-pressed garment, this approach centers on a deliberate sequence of steps that aligns with the DTF printing process and direct-to-film transfers. Understanding the DTF transfers workflow helps you reduce waste, improve consistency, and scale production by following the DTF transfer workflow steps and by optimizing heat press settings for different fabrics. In this guide, we’ll break down each phase—from design to garment—so you can implement a smooth, repeatable process that yields durable, vibrant results. This introduction sets the stage for practical tips you can apply to achieve dependable results across a range of fabrics.
For newcomers, think of this as a film-based garment-imprinting workflow that uses adhesive powders and heat to transfer artwork to textiles. Another way to describe it is a modern textile decoration process, where artwork is prepared digitally and bonded to fabric via heat, pressure, and a clear transfer film. This approach emphasizes consistent preparation, precise curing, and careful press settings to ensure durable, vibrant results, aligning with common production pipelines. In practice, teams use on-demand decoration methods that scale from prototypes to small-batch runs while maintaining color accuracy and wash durability.
DTF transfers workflow: A step-by-step approach to reliable production
The DTF transfers workflow maps the journey from concept to finished garment, breaking it into distinct stages that align with production realities. By treating design, film preparation, powdering, curing, transfer, and post-press finishing as individual yet connected steps, small teams can execute with predictability. This structure follows the DTF transfer workflow steps with defined inputs, outputs, and quality gates to reduce waste and variation.
With a documented workflow, you can set up repeatable SOPs, establish baseline heat press settings for common fabrics, and track results across batches. This approach supports scalable DTF garment production by enabling batch processing and easier troubleshooting when issues arise.
Finally, adopting a workflow mindset helps you communicate clearly with suppliers of film, ink, and powders, ensuring consistent film quality and ink adhesion across runs.
Design to film: preparing artwork for the DTF printing process
Design setup matters; ensure artwork is at 300 dpi or higher, use vector graphics for logos whenever possible, and manage colors in CMYK to align with the DTF printing process. Prepare a separate white underbase layer to boost opacity on dark fabrics and preserve color vibrancy on the final garment. Export the design in PNG or TIFF with preserved transparency, and double-check there are no stray pixels or unwanted bleed areas that could affect the transfer when moving to direct-to-film transfers.
A separate color separation for the white underbase improves edge sharpness and color reproduction on textiles, ensuring consistency when the transfer adheres to fabric. Keep layers aligned with the DTF transfer workflow steps and verify bleed margins to prevent misregistration during the film print.
Before committing to a full run, perform a test print on sample fabric to confirm color management, film alignment, and edge definition for the DTF printing process.
Powdering and curing: readying the film for direct-to-film transfers
Powdering is a critical bridge between printing and transfer. An even, medium spray of adhesive powder keeps inks in place and reduces ghosting in direct-to-film transfers. Too much powder creates a rough feel and edge stiffness; too little compromises transfer integrity.
Curing fixes the powder-to-ink bond and prepares the film for press. A controlled curing cycle improves wash durability and minimizes powder shedding, helping throughout multiple wash cycles. Visual checks for clumps and even coverage support reproducible results across batches, which benefits the DTF garment production.
Quality checks at this stage guard against inconsistent adhesion and edge defects. If adhesion varies, adjust powder application, curing time, or temperature, and record results to continuously improve the DTF transfer workflow steps.
Heat press settings and fabric considerations for consistent results
Heat press settings depend on fabric composition and the transfer film you’re using. A typical starting point is 185–195°C (365–383°F) for 15–20 seconds with medium to firm pressure, then verify the transfer by a cold peel if recommended by the ink or powder vendor.
Different fabrics—cotton, blends, polyesters—require adjustments to time and temperature to prevent scorching or ink bleeding. Use a teflon sheet or silicone parchment to distribute heat evenly and protect the garment surface, and consider using a release canvas to avoid scorching.
Add a post-press cure: a short second press without the garment can help set edge details and improve wash durability. Document each setting so you can reproduce results across items and scale production in the DTF garment production pipeline.
Quality control and scalable DTF garment production: from prototype to full runs
Quality control ensures consistency across batches. After each transfer, inspect for even color, crisp edges, and uniform adhesion, and run wash tests to verify colorfastness for direct-to-film transfers.
Maintain standardized SOPs, use color swatches and test plaques, and keep a production log to track throughput, scrap rates, and rework time. These practices support scalable DTF garment production and help you meet customer demand with predictable quality.
When issues arise, document the symptom, adjust artwork prep, powdering, curing, and pressing parameters, and re-run tests. By following the DTF transfer workflow steps, you can move smoothly from prototyping to reliable full-scale runs.
Frequently Asked Questions
What are the key steps in the DTF transfer workflow steps from design to garment?
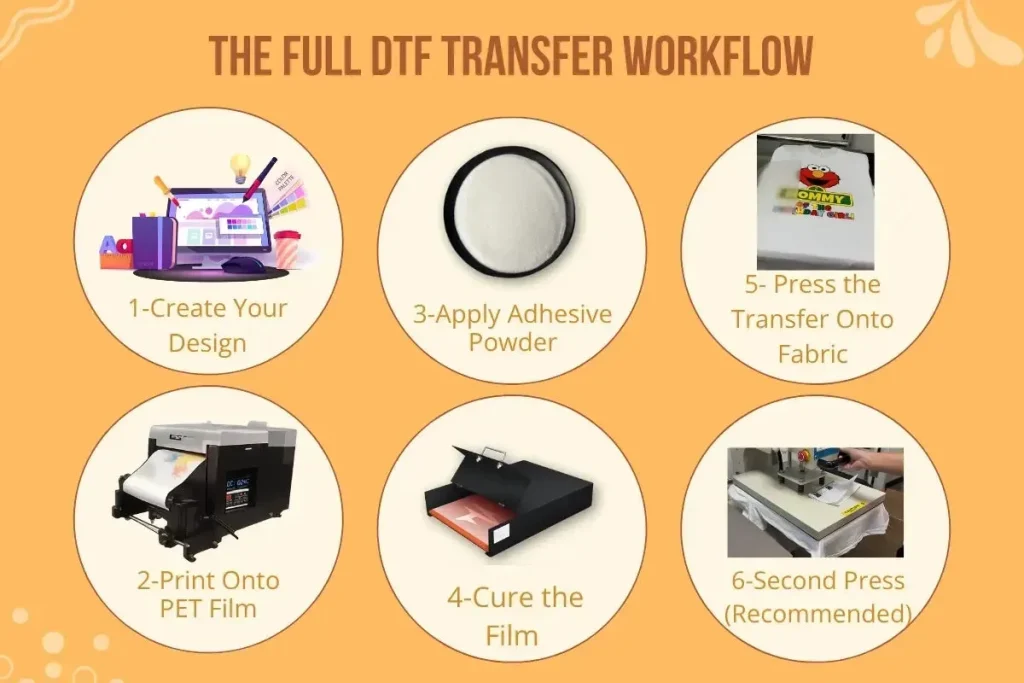
The DTF transfers workflow steps begin with design prep (high-resolution artwork, CMYK workflow, and a dedicated white underbase layer), then film printing with adhesive powder, followed by a curing stage. Next comes transferring the print to fabric using a heat press, and finishing with post-press steps to lock in durability. Include quality checks at each stage to ensure color vibrancy, registration, and wash durability.
How do heat press settings affect the DTF printing process when transferring to different fabrics?
Heat press settings must be tuned to fabric type and the transfer film used in the DTF printing process. A common starting point is 185–195°C (365–383°F) for 15–20 seconds with medium to firm pressure, but cotton, blends, and synthetics may require adjustments. Always test and consider a post-press cure to maximize adhesion and edge quality for reliable DTF garment production.
What quality-control checks are essential in the DTF printing process to ensure consistent results?
Key quality-control checks include verifying film quality, uniform powder adhesion, and proper curing before transfer, plus post-transfer checks for even color, crisp edges, and uniform adhesion. Conduct wash tests to assess colorfastness and durability, and if issues appear, review artwork prep, powdering, curing, and heat-press parameters to maintain consistency across runs.
What common issues occur in direct-to-film transfers and how can I troubleshoot them during DTF garment production?
Common issues include ghosting, peeling, cracking, and color shifts. Troubleshoot by ensuring proper pre-press moisture removal, confirming the film lies flat, adjusting powder density and curing, and verifying heat-time combinations with test prints. Tracking settings and results helps pinpoint recurrence sources in the DTF transfer workflow.
What strategies help scale production through the DTF transfer workflow, balancing speed and quality?
To scale DTF garment production, implement a clear SOP covering artwork prep, film printing, powdering, curing, transfer, and post-press finishing, and standardize brands for ink, powder, and film. Use batch processing, labeled film inventories, and QC tools (color swatches, test plaques) plus production logs to monitor throughput and rework, enabling reliable growth in DTG-style outputs with DTF transfers.
| Phase / Topic | Key Points |
|---|---|
| Introduction | DTF transfers workflow redefines how small businesses and hobbyists bring designs to life on fabrics; emphasizes a deliberate sequence from artwork to final heat-pressed garment; aims to reduce waste, improve consistency, and scale production without sacrificing quality. |
| What you’ll learn in this post | Artwork prep and color management; essential stages of DTF printing; powdering and curing steps; heat-press settings for different fabrics; quality-control checks; production planning, workflow optimization, and scalable DTF garment production. |
| 1) Designing for DTF | High-res artwork (≥300 dpi); vector logos when possible; CMYK color space or calibrated workflows; clean edges on raster elements; separate white underbase layer for opacity on dark fabrics; export as PNG/TIFF with transparency; check for stray pixels and bleed. |
| 2) From design to film | Print image on transparent PET film with white and color inks in separate passes; use reliable water-based or pigment inks; film should be consistent in thickness and have minimal curl to prevent misregistration; apply adhesive powder to the printed film and cure. |
| 3) Powdering and curing | Even, precise powder application; avoid too much or too little powder; curing fixes the powder-ink bond; conduct quality checks for powder clumps and adhesion; adjust application, drying time, or curing temperature as needed. |
| 4) Transferring to fabric | Place printed film on garment with a protective sheet; pre-press to remove moisture and wrinkles; apply uniform heat and pressure during transfer; typical range: ~180–205°C for 15–25 seconds; follow supplier guidelines and run test prints. |
| 5) Heat press settings and fabric considerations | Starting point: 185–195°C for 15–20 seconds with medium–firm pressure; adjust for blends and higher-temp fabrics; consider cold-peel for certain inks or powders; use teflon/silicone parchment to protect surfaces; include a post-press cure step. |
| 6) Quality control | Check for even color, crisp edges, and uniform adhesion; look for ghosting or color bleed; perform wash tests to verify colorfastness and durability; adjust artwork prep, powdering, curing, and pressing parameters as needed. |
| 7) Troubleshooting | Ghosting from misregistration or moisture; peeling from insufficient heat or adhesion; cracking at edges from stiff fabric or short press time; color inconsistencies from color-management gaps or film quality; maintain a settings log. |
| 8) Workflow optimization and scalability | Standardize steps with a simple SOP; use consistent inks, powders, and films; batch-processing for small runs; label and store printed films; employ color swatches and test plaques; maintain a production log to improve throughput and reduce waste; scale from prototypes to larger runs. |
| 9) The future of DTF | Trends include faster turnaround, better adhesion, and eco-friendly powders; ongoing learning and updating of films, inks, and curing methods; continuously refine SOPs to stay competitive. |
| Conclusion | DTF transfers workflow provides a practical, scalable route to vibrant, durable apparel from design to garment. Focus on careful design prep, precise film printing, even powdering, and controlled heat-pressing to achieve consistent results across batches. Treat each stage as a controllable parameter, track outcomes, and refine with data-driven decisions to reduce waste and lead times while enabling scalable production of high-quality DTG-style prints via direct-to-film methods. |